|
|
|
| 1. Add Tax Venue |
|
|
|
|
|
Tax Venues can be set up for all of the areas (venues) where you do work and/or purchase materials and services that are subject to tax.
Tax Venues can be used when creating Buyout Commitments (such as a PO) on a Project. They can also be set on the Customer Facility to be used by default on all new Projects associated with that Customer and Facility (can be changed per Project if necessary).
|
|
|
Path:
|
|
Configuration menu | Accounting | Tax Venues
|
|
|
Steps:
|
|
•
|
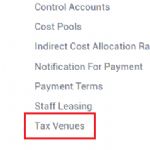
From the Configuration menu, click "Tax Venues" (under the heading: Accounting) See Figure 1.
|
|
|
•
|
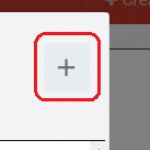
Click the New (+) icon See Figure 2.
|
|
|
•
|
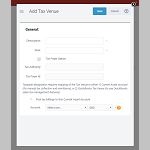
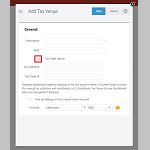
Enter a Description for the Tax Venue (i.e. state, county, municipality) and the Rate (4% = 4) See Figure 3.
|
|
|
•
|
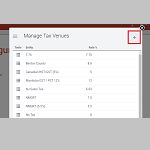
Click "Save" See Figure 4.
|
|
|
|
|
|
|
Figure 1,
From the Configuration section, click "Tax Venues" under the "Accounting" heading
|
|
|
Figure 2,
Click to add a new tax venue and rate
|
|
|
|
Figure 3,
Enter the required fields
|
|

|
|
Figure 4,
Click to save
|
|
|
|
|
|
|
|
| 2. Tax Payer Option and VAT |
|
|
|
|
|
In a venue that uses Value Added Tax, such as Texas or Canada, you will be collecting tax from your customer. Tax Venues for VAT are tracked separately from taxes for buyout commitments in the configuration, and must be set up with their own venue entries.
Once they are added as a new Tax Venue, the "Tax Payer Option" must be selected. Enter the appropriate Tax Authority and ID information, then set an account for withholding. If a venue is not marked for Tax Payer Option, it will not be available as a VAT option.
|
|
|
Path:
|
|
Configuration menu | Accounting | Tax Venues
|
|
|
Steps:
|
|
•
|
Add a new Tax Venue in Configuration | Tax Venues. See Figure 1.
|
|
|
•
|
Select "Tax Payer Option" and enter Tax Authority, Tax ID information, and Tax account details. See Figure 2.
|
|
|
•
|
Click "Save"
|
|
|
|
|
|
|
Figure 1,
Add a tax venue as normal
|
|
|
Figure 2,
|
|
|
|
|
Figure 2,
|
|
|
|
|


