|
|
|
| 1. Enter a Vendor Invoice |
|
|
|
|
|
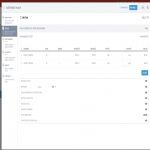
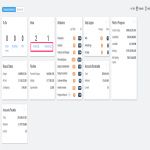
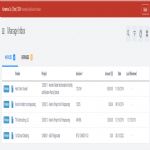
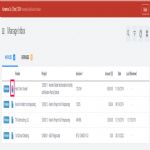
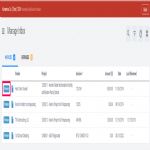
Vendor Invoices should be entered into RedTeam as soon as they are received. The sooner they are entered, the sooner they are routed for approval. Once the Invoice has been entered into the application and routed, it will appear in the Inbox of the first person to approve. You can always check the hierarchy of approvers for a particular Project by going to the Project Team and looking for the yellow "A" icon next to the name of the user, then hovering over the icon to see their approval authority.
Ideally, Invoices are entered against Open Commitments that are located in the Buyout tab of a Project. It is recommended that you do not start receiving and approving invoices unless you have an executed Commitment (contract) with the Vendor. However, if you have permission to do so, you can enter an Invoice that is not associated with any Open Commitment.
Additonally, Vendor Invoices may be entered from several places, such as the "Create" icon on the top menu bar, the Vendors menu > Invoices tab, and Manage Vendor Invoices within a Project. Vendor Invoices can also be created from the Commitment tab within the Vendors menu. This method can be used to create a Vendor Invoice for each Vendor Commitment that is in Committed or Executed status and for Open Projects.
|
|
|
Path:
|
|
Project | Buyout Tab
|
|
|
Steps:
|
|
•
|
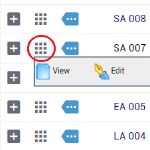
From the Buyout tab of a Project, locate the commitment for which you have received an Invoice
|
|
|
•
|
Click the tool icon and select "Create Vendor Invoice" See Figure 1.
|
|
|
•
|
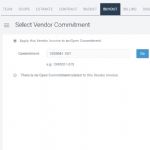
Click "Go"
|
|
|
•
|
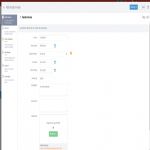
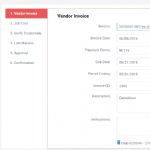
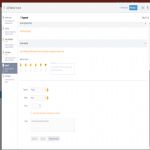
Step 1, enter the information as it is displayed on the Vendor's Invoice and upload a digital copy of the Invoice as an Attachment See Figure 2.
|
|
|
•
|
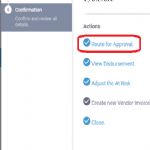
Click on Step 6. Confirmation
|
|
|
•
|
From the Confirmation Step, click "Route for Approval" See Figure 3.
|
|
|
•
|
If your company does not utilize the Routing feature, or if you are a user who enters AND approves Invoices, please see wiki: Approve a Vendor Invoice
|
|
|
•
|
X
|
|
|
•
|
X
|
|
|
•
|
Click "Next"
|
|
|
•
|
X
|
|
|
•
|
X
|
|
|
•
|
X
|
|
|
•
|
X
|
|
|
•
|
X
|
|
|
|
|
|
|
|
Figure 0,
|
|
|
Figure 1,
Click the option enter an Invoice against this Commitment
|
|
|
|
Figure 1,
Click "Go" to enter a new Invoice against this Commitment
|
|
|
|
Figure 2,
TIP: it's important to enter a unique Invoice number (i.e. "Proj.1230002-Inv.001" instead of "001")
|
|
|
|
|
Figure 2,
|
|
|
|
Figure 3,
The Invoice will be automatically routed to the Inbox of the first user to Approve on this Project
|
|
|
|
|
Figure 3,
|
|
|
|
|
Figure 3,
|
|
|
|
|
Figure 3,
|
|
|
|
|
Figure 3,
|
|
|
|
|
Figure 3,
|
|
|
|
|
Figure 3,
|
|
|
|
|
Figure 3,
|
|
|
|
|
Figure 3,
|
|
|
|
|
Figure 3,
|
|
|
|
|
|
|
|
| 2. Approve a Vendor Invoice |
|
|
|
|
|
Once an Invoice has been entered into RedTeam (see Wiki: Enter a Vendor Invoice) they can be Approved by one or more users who have the authority and permissions to approve Invoices. These Invoices can be approved from the Inbox, directly within a Project, or from the Vendors menu (Invoices tab). If your company utilizes the electronic routing of Invoices, it is most likely that you will approve from your Inbox.
This Wiki provides instructions on approving a Vendor Invoice that has already been entered into RedTeam.
|
|
|
Path:
|
|
Open the Vendor Invoice from your Inbox OR Edit the Vendor Invoice from the Project or Vendors menu
|
|
|
Steps:
|
|
•
|
Step 1: Review the information for the Invoice that was recorded by the user who entered the Invoice into RedTeam See Figure 1.
|
|
|
•
|
Click "Next"
|
|
|
•
|
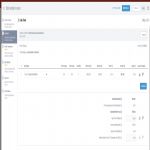
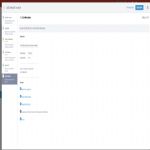
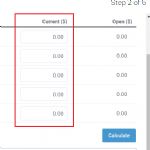
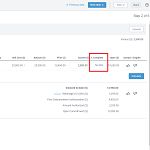
Step 2: job cost the Invoice by distributing the amount on the line item(s) from the Vendor's Commitment in the Current column See Figure 2.
|
|
|
•
|
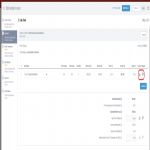
In the Job Cost step, individual line items can be Accepted and Disputed by using the thumbs-up and thumbs-down buttons See Figure 3.
|
|
|
•
|
(tip) To View the digital copy of the Vendor Invoice, the Vendor's Commitment, this Disbursement Authorization, or the Audit report, click "View" See Figure 4.
|
|
|
•
|
Once you have entered the amount, click "Calculate"
|
|
|
•
|
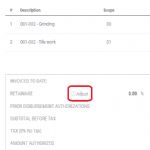
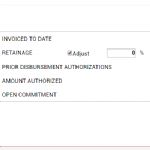
At the bottom, review the Amount Authorized and adjust Retainage if necessary by clicking the "Adjust" checkbox See Figure 5.
|
|
|
•
|
Retainage can be adjusted by percentage or as a dollar amount by toggling between the two.
|
|
|
•
|
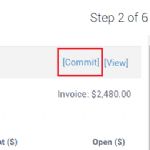
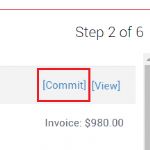
Once you have verified your Amount Authorized is correct, click "Commit" See Figure 6.
|
|
|
•
|
Click "Next"
|
|
|
•
|
Step 3: verify the status of all required credentials See Figure 7.
|
|
|
•
|
Click "Next"
|
|
|
•
|
Step 4: review the status of Lien Waivers from all Claimants involved with this Vendor's Commitment See Figure 8.
|
|
|
•
|
Click "Next"
|
|
|
•
|
Step 5: rate the Vendor's performance, enter any notes in the Approval History feed (optional), then Approve or Reject the Invoice below See Figure 9.
|
|
|
•
|
Click "Next"
|
|
|
•
|
Step 6: review the confirmation information and click "Close" to close the window or "View Disbursement" to review the Invoice details See Figure 10.
|
|
|
|
|
|
|
Figure 1,
You can make changes to the info in Step 1 if the Invoice is in DRAFT status (Step 2 to Uncommit)
|
|
|
|
Figure 1,
|
|
|
|
Figure 2,
Enter the amount to be approved
|
|
|
|
Figure 3,
Accept/Dispute buttons
|
|
|
|
Figure 4,
Use these reports and docs to help you enter the job cost for the Invoice
|
|
|
|
|
Figure 4,
|
|
|
|
Figure 5,
If you need to make changes to the amount, click "Modify" to change the numbers above
|
|
|
|
|
Figure 5,
|
|
|
|
Figure 6,
Click Commit to lock in the Amount Authorized for Approval
|
|
|
|
|
Figure 6,
|
|
|
|
Figure 7,
Credentials listed here are required for the Vendor's Commitment, you can add more from the dropdown
|
|
|
|
|
Figure 7,
|
|
|
|
Figure 8,
You can manage Lien Law documents by accessing the section from the Project Home menu
|
|
|
|
|
Figure 8,
|
|
|
|
Figure 9,
After you click Approve the Invoice will move to the next Inbox in the routing workflow
|
|
|
|
|
Figure 9,
|
|
|
|
Figure 10,
Confirmation step
|
|
|
|
|
|
|
|
| 3. Execute a Vendor Invoice |
|
|
|
|
|
The last step to finalizing an Invoice from a Vendor before issuing the payment is to Execute the Invoice. Executing is typically done by the last user in the approval workflow, often a member of your Accounting team. This user is responsible for reviewing and confirming all the necessary items are in place before making the payment, including the job cost, credentials, lien waivers, and all approvals. Once everything is in place and all necessary approvals have been made, the user can Execute the Invoice.
Once Executed, the Invoice is ready for payment.
|
|
|
Path:
|
|
Open the Vendor Invoice from your Inbox OR Edit the Vendor Invoice from the Project or Vendors menu
|
|
|
Steps:
|
|
•
|
Review Steps 1 - 4 and verify that all necessary items and documents are in place
|
|
|
•
|
Go to Step 5 See Figure 1.
|
|
|
•
|
Review and verify that all necessary approvals have been made
|
|
|
•
|
Rate the Vendor's performance and enter any notes in the Approval History feed (optional)
|
|
|
•
|
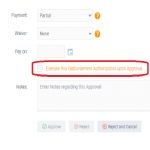
Indicate if this is a Partial or Final Payment in the dropdown
|
|
|
•
|
Indicate if you require a Conditional, Unconditional, or no Waiver from the dropdown
|
|
|
•
|
Enter a Pay on date, if necessary
|
|
|
•
|
Click the checkbox to "Execute this Disbursement Authorization upon Approval" See Figure 2.
|
|
|
•
|
Click "Approve"
|
|
|
•
|
X
|
|
|
•
|
X
|
|
|
•
|
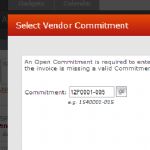
Enter the Commitment number and click "go"
|
|
|
|
|
|
|
|
Figure 0,
|

|
|
Figure 1,
|
|
|
|
|
Figure 1,
|
|
|
|
|
Figure 1,
|
|
|
|
|
Figure 1,
|
|
|
|
|
Figure 1,
|
|
|
|
|
Figure 1,
|
|
|
|
Figure 2,
Be sure this box is checked before you click Approve in order to Execute the Invoice
|
|
|
|
|
Figure 2,
|
|
|
|
|
Figure 2,
|
|
|
|
|
Figure 2,
|
|
|
|
Figure 2,
If you do not know the Commitment number, you can look it up in the Buyout tab of the Workorder
|
|
|
|
|
|
|
|
| 4. How to Release Retainage (Vendor Invoice) |
|
|
|
|
|
As Invoices are approved in RedTeam for partial or full payments, you will eventually want to release Retainage being held for a particular Vendor. Retainage is calculated by percentage, so releasing Retainage in RedTeam is as simple as reducing the Retainage percentage to zero. Follow the instructions below to enter a Vendor Invoice to release Retainage.
|
|
|
Path:
|
|
Enter a new Vendor Invoice OR Edit a Draft Vendor Invoice
|
|
|
Steps:
|
|
•
|
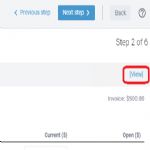
Go to Step 2 of the Invoice See Figure 1.
|
|
|
•
|
If you are only releasing Retainage, you will not enter any progress in the Current column, then click "Calculate" See Figure 2.
|
|
|
•
|
Click the checkbox marked "Adjust" See Figure 3.
|
|
|
•
|
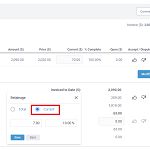
You will have the option to adjust the total retainage for all invoices to date, or only the current invoice See Figure 4.
|
|
|
•
|
Reduce the Retainage percentage to "0" to release all Retainage and move it to the Amount Authorized at the bottom See Figure 5.
|
|
|
•
|
Click "Modify"
|
|
|
•
|
Click "Commit" See Figure 6.
|
|
|
•
|
Proceed with the routing workflow and approval process normally
|
|
|
|
|
|
|
Figure 1,
|
|
|
Figure 2,
For Invoices releasing retainage only, leave the Current amount at zero
|
|

|
|
Figure 3,
|
|
|
|
Figure 4,
Selecting "Current" will only adjust the retainage amount on the current invoice
|
|
|
|
Figure 5,
Once Retainage has been adjusted to zero, it will show as the Amount Authorized
|
|
|
|
|
Figure 5,
|
|
|
|
Figure 6,
Click Commit to lock in the Amount Authorized
|
|
|
|
|
Figure 6,
|
|
|
|
|
|
|
|
| 5. Invoice Percent Complete |
|
|
|
|
|
When you are editing a vendor invoice and arrive on Step 2: Job Cost, you are able to enter the amounts being invoiced by your vendor, broken down by the individual scope of work lines. As you enter amounts to be invoiced, RedTeam will display a percentage of the invoiced total completed. This is calculated based on the total of the prior and current amounts.
|
|
|
Path:
|
|
(miscellaneous sources) | Vendor Invoice | Step 2: Job Cost
|
|
|
Steps:
|
|
•
|
Create or edit a vendor commitment. See Figure 1.
|
|
|
•
|
Go to Step 2. You will find the percentage completion for each invoice line, based on the prior and current amounts. See Figure 2.
|
|
|
|
|
|
|
Figure 1,
|
|
|
Figure 2,
Each scope of work line item will show its own percentage.
|
|
|
|
|
|
|
|
| 6. How do I have more than one draft vendor invoice for a commitment? |
|
|
|
|
|
When working with invoices for a vendor's buyout commitment, RedTeam can be configured to allow multiple simultaneous draft vendor invoices simultaneously, or only one at a time. If your Accounts Payable workflow is frequently interacting with multiple invoices from vendors, it may be very helpful to enable this feature.
Multiple draft invoices are controlled by the configuration for their related Buyout Commitment. If you have administrator permissions, you can edit a Commitment in the Configuration Menu.
|
|
|
Path:
|
|
Configuration Menu | Projects | Commitment Forms | Toolbox Icon | Edit
|
|
|
Steps:
|
|
•
|
Click on the Configuration Menu on the left
|
|
|
•
|
Click Commitment Forms within the Projects section of the Configurations See Figure 1.
|
|
|
•
|
Find the Commitment Form you want to edit and click the toolbox icon to its left, then click Edit
|
|
|
•
|
Look for the "Progress Metric" section and click the "Allow multiple Draft Invoices" checkbox See Figure 2.
|
|
|
|
|
|
|
|
Figure 0,
|
|
|
Figure 1,
Enter the Commitment Forms and find the specific form to edit
|
|
|
|
|
Figure 1,
|
|

|
|
Figure 2,
When checked, new commitments of this type will allow multiple draft invoices
|
|
|
|
|
|
|
|
| 7. Inbox |
|
|
|
|
Any invoice or expense approvals that are routed to a user will appear in their inbox. Users can view information and jump directly to the approval step for any of the items in their inbox. The tabs at the top give the ability to switch between viewing invoice or expense authorizations.
|
|
|
Path:
|
|
Inbox
|
|
|
Steps:
|
|
•
|
On the Company Dashboard in the "Inbox" tile, click "Invoices" or "Expenses" See Figure 1.
|
|
|
•
|
Select either Invoices or Expenses Tab to view pending approvals See Figure 2.
|
|
|
•
|
Clicking the �View� icon will display the Disbursement Authorization for invoices or the Expense Receipt for expenses See Figure 3.
|
|
|
•
|
Clicking the �Review� button will take the user to review the documents information and approve or deny the invoice or expense See Figure 4.
|
|
|
|
|
|
|
Figure 1,
Click on "Invoices" or "Expenses" to open Inbox
|
|
|
Figure 2,
Inbox Tabs
|
|
|
|
Figure 3,
Inbox View Button
|
|
|
|
Figure 4,
Inbox Review Button
|
|
|
|
|
|
|
|
| 8. TeamPlayer Invoice Retainage Warning |
|
|
|
|
|
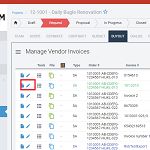
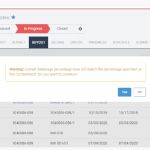
For TeamPlayer invoices a check is done on retainage when the invoice is committed. If the current retainage differs from the commitment then a warning message will appear. At that point a user can select �Yes� to accept the current retainage and commit the invoice or �No� to reopen the invoice and edit the retainage.
|
|
|
Path:
|
|
Project | Manage Vendor Invoices | Tools | Commit
|
|
|
Steps:
|
|
•
|
Vendor invoice is submitted via TeamPlayer.
|
|
|
•
|
User "Commits" invoice in Step 2 of "Edit Invoice" or selecting the "Tools" button and clicking "Commit"
|
|
|
•
|
Warning message may appear letting user know if current retainage and retainage listed on commitment do not match. User can click "Yes" or "No". See Figure 1.
|
|
|
|
|
|
|
|
Figure 0,
|
|
|
|
Figure 0,
|
|
|
|
Figure 1,
TeamPlayer Retainage Warning
|
|
|
|
|
|
|
|
| 9. Mass Upload Vendor Invoices from Spreadsheet |
|
|
|
|
|
Multiple vendor invoices can be uploaded at once by using the "Import Vendor Invoices from a Spreadsheet" feature. By filling out the import spreadsheet and completing the upload, multiple invoices across projects can be entered at one time. Once the invoices are uploaded they will appear in draft status and automatically routed for approval.
To be able to use the "Import Vendors from a Spreadsheet" feature, users must have the AddDisbursementAuth permission assigned to their role.
Columns Breakdown on "Vendor Invoices Template" - Commitment Number: Enter the Vendor Commitment number if this Invoice is being applied to an active commitment. Vendor Commitment must be active in Committed or Executed status.
- Vendor Name: Required if a vendor commitment does not exist. Enter the vendor's name that is submitting the invoice. The vendor's profile must already exist in your database.
- Invoice Type: Required if a vendor commitment does not exist. Enter "SI", "MI", "LI", "EI", or "OI" in this column to specify the invoice type.
- SI = Subcontract Invoice
- MI = Material Invoice
- LI = Labor Invoice
- EI = Equipment Invoice
- OI = Other Invoice
- Project Number: Required field to assign the invoice to the correct project. If uploading multiple invoices to different projects, enter each project number here. Projects must be in Request, Proposal, or In Progress status.
- Scope Number: Required only if a vendor commitment does not exist. Enter Two Digits, eg "00" for Original or "01" for Scope Change 01.
- Cost Code: Required if a vendor commitment does not exist for the invoice. The cost code must exist and be active.
- Cost Category: Required only if a vendor commitment does not exist for the invoice. Enter the Cost Category Name or Code. Eg. M, S, etc.
- Invoice Number: Required field for all invoices.
- Invoice Amount: Required field for all invoices. Enter the total amount that is being invoiced.
- Invoice Date: Required field for all invoices. Date that the invoice was submitted.
- Due Date: Required field for all invoices. Date that the invoice is due to be completed.
- Period Ending: Can be used to specify the period that the invoice will fall in for reporting purposes.
- Tax Venue: Required for vendor commitments that have tax applied. If any taxes are to be applied to the invoice. The tax venue must exist and match exactly what is in Configuration.
- Payment Terms: Required if vendor commitment does not exist. Terms and conditions that stipulate an amount of time in which payment is due for goods or services that is agreed upon by both parties.
- Description: Required for all invoices. Description of what is being invoiced. Character limit 1000.
- URL Attachment: Enter the URL from the Shared Drive Attachments must be PDF or image file. URL must be valid and file has to be public and shared. Current cload storage services supported are Dropbox and Google Drive.
- Instructions: Any instructions that pertain to the vendor invoice. Character limit 5000.
- Require Lien Waiver (Y/N): Required only if a vendor commitment does not exist. Enter "Y" or "N" according to whether the vendor must provide Waivers for the vendor invoice.
- Y = Yes (Waiver Required)
- N = No (Waiver Not Required)
|
|
|
Path:
|
|
Companies | Vendors | Invoices & Project | Buyout Tab | Vendor Invoices
|
|
|
Steps:
|
|
•
|
There are two sections in RedTeam to begin the Import Vendor Invoices from Spreadsheet process.
|
|
|
•
|
Option 1: Click on �Companies� from the left side menu.
|
|
|
•
|
From the submenu select �Vendors�
|
|
|
•
|
Click on the tab �Invoices�.
|
|
|
•
|
Click the �+� button and select �Import Vendor Invoices from a Spreadsheet� from the window that appears.
|
|
|
•
|
Option 2: Select �Projects� from the left side menu.
|
|
|
•
|
Access a project.
|
|
|
•
|
Click on the �Buyout� tab.
|
|
|
•
|
Click the �+� button and select �Import Vendor Invoices from a Spreadsheet� from the window that appears.
|
|
|
•
|
The �Vendor Invoices Template� can be downloaded by clicking on the link that appears in the �Import from Spreadsheet� dialogue box.
|
|
|
•
|
The filled out �Vendor Invoices Template� can either be Dragged and Dropped or searched for and selected by clicking on the �ADD FILE� button.
|
|
|
•
|
Once the file has been selected, it will be scanned for any errors or issues. If any are found, a spreadsheet will be automatically downloaded with th
|
|
|
•
|
If no files are found then an upload complete message will appear to advise the user of the process being completed successfully.
|
|
|
|
|
|
|
|
Figure 0,
|
|
|
|
Figure 0,
|
|
|
|
|
Figure 0,
|
|
|
|
|
Figure 0,
|
|
|
|
|
Figure 0,
|
|
|
|
|
Figure 0,
|
|
|
|
|
Figure 0,
|
|
|
|
|
Figure 0,
|
|
|
|
|
Figure 0,
|
|
|
|
|
Figure 0,
|
|
|
|
|
Figure 0,
|
|
|
|
|
Figure 0,
|
|
|
|
|
Figure 0,
|
|
|
|
|


