|
|
|
| 1. Add Vendor Credentials |
|
|
|
|
In RedTeam, you can use Credentials to track any type of insurance, certification, qualification, or requirement you may want to track for any given Entity. This includes your company as the Service Provider, credentials for employees, and even Customers, but most commonly, for your Vendors (subcontractors and material providers).
RedTeam allows you to configure Commitments (subcontracts, Purchase Orders, Labor Service Agreements, etc.) to automatically check the status of Credentials assigned to the Vendor to whom you want to issue a Commitment. By configuring this, RedTeam will also automatically check the status of the Credentials again upon approving an Invoice from that Vendor for payment.
Once the Credential type has been created, you can assign it to a Vendor. Do this by locating the Vendor in the Vendors menu. You can search by name, use the Sort options (next to Menu button), or expand the Types to display Vendors.
|
|
|
Path:
|
|
Companies Menu| Vendors menu | <Vendor> | Credentials tab
|
|
|
Steps:
|
|
•
|
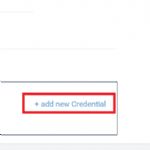
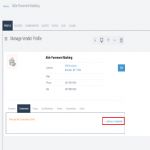
From the Vendor Profile, click the Credential tab at the bottom, then click "+add new credential" See Figure 1.
|
|
|
•
|
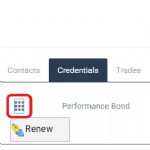
Alternatively, use the tools icon for an existing Vendor credential to click "Renew" See Figure 2.
|
|
|
•
|
Scroll to the section "Credentials"
|
|
|
•
|
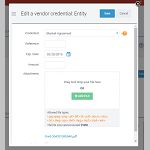
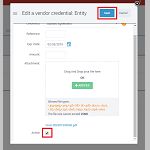
Select the Credential Type from the dropdown and fill out the required information as well as upload a scanned copy (if possible) See Figure 3.
|
|
|
•
|
Check "Mandatory" if you want this Credential to appear automatically on every Commitment for this Vendor
|
|
|
•
|
Click "Save"
|
|
|
|
|
|
|
Figure 1,
If you have permission to add credentials from the Profile tab, click the button
|
|
|
Figure 2,
Select Edit, then click on Renew
|
|
|
|
|
Figure 2,
|
|

|
|
Figure 3,
Fill out the credential information and upload a copy
|
|
|
|
|
Figure 3,
|
|
|
|
|
Figure 3,
|
|
|
|
|
|
|
|
| 2. Renew Vendor Credentials |
|
|
|
|
Most of the time, Credential documents will have expiration dates. This necessitates renewing each credential periodically to keep them up to date. Credentials can be updated at any time from the vendor profile, or from within a Buyout Commitment. This second option is important to note, as the buyout configuration may require up-to-date credentials in order to be committed.
|
|
|
Path:
|
|
Companies Menu | Vendors | <vendor profile>
|
|
|
Steps:
|
|
•
|
Navigate to the Companies > Vendors Menu, find the vendor in question and click their name to view their profile.
|
|
|
•
|
Click the Credentials tab in the bottom box on the vendor profile See Figure 1.
|
|
|
•
|
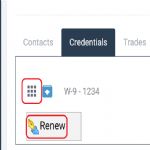
Click the Toolbox icon for the Credential that needs to be renewed, then click the Renew button See Figure 2.
|
|
|
•
|
Add the reference information as needed, attach the document, then click save. See Figure 3.
|
|
|
•
|
The Credential can also be renewed from a buyout commitment in step 4. Click the Upload button to update the credential. See Figure 4.
|
|
|
|
|
|
|
|
Figure 0,
|
|
|
Figure 1,
View all credentials in the credentials tab
|
|
|
|
Figure 2,
|
|
|
|
Figure 3,
Add the document and details.
|
|
|
|
Figure 4,
Credentials must be up to date to commit or execute a buyout, depending on configuration.
|
|
|
|
|
|
|
|
| 3. Remove Vendor Credentials |
|
|
|
|
|
If a credential is no longer relevant, or otherwise unneeded, it can be deactivated within the Vendor's profile. It is not a necessary task, but it can help to clean up your credential lists. Primarily, it will prevent the deactivated credential from showing in credential reports and in Buyout Commitments.
Deactivated credentials are hidden by default and the credentials list in the Vendors Overview must be filtered to include "inactive" credentials to view them.
|
|
|
Path:
|
|
Companies Menu | Vendors | <vendor profile>
|
|
|
Steps:
|
|
•
|
Navigate to the Companies > Vendors Menu, find the vendor in question and click their name to view their profile.
|
|
|
•
|
Click Edit See Figure 1.
|
|
|
•
|
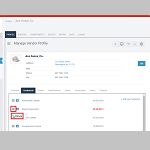
Scroll down to the Credentials section of the profile, then click the tools icon for the credential you wish to de-activate and select "Edit" See Figure 2.
|
|
|
•
|
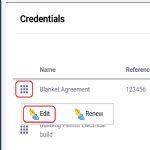
OR Click on the Credentials tab at the bottom of the Vendor profile, then click the Toolbox icon for the credential in question and select "Renew" See Figure 3.
|
|
|
•
|
Uncheck the Active checkbox at the bottom, then click Save See Figure 4.
|
|
|
•
|
To view and reactivate deactivated credentials, Edit the vendor profile and click the Show All link at the top right of the Credentials section See Figure 5.
|
|
|
|
|
|
|
|
Figure 0,
|

|
|
Figure 1,
Edit the vendor profile to remove/deactivate credentials
|
|
|
|
Figure 2,
This option can be found by editing the entire vendor profile
|
|
|
|
Figure 3,
Renew, edit, or deactivate credentials as needed
|
|
|
|
Figure 4,
Credentials can only be deactivated, not entirely deleted.
|
|

|
|
Figure 5,
Deactivated credentials can be reactivated.
|
|
|
|
|
|
|
|
| 4. View Vendor Credential Expiration |
|
|
|
|
|
Credentials are qualifications certifying that a person or company does, in fact, meet the requirements for a job or task. Vendor credentials are managed in the Vendor's profile, and may be changed or updated at any time. Because credentials are important in ensuring the safety and quality of your work, you may view the Credential expiration report which lists all Vendors in the system whose credentials have expired or are about to expire.
|
|
|
Path:
|
|
Companies Menu | Vendors | View Icon
|
|
|
Steps:
|
|
•
|
From the Companies menu, select Vendors
|
|
|
•
|
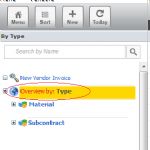
Click "Overview by: ___" (Overview by: will depend on the "Sort" category selected)
|
|
|
•
|
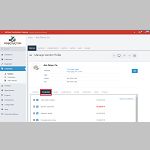
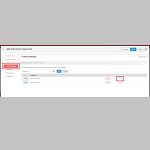
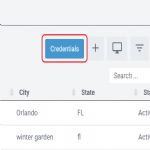
Click the blue "Credentials" Button on the top right of the Vendors list See Figure 1.
|
|
|
•
|
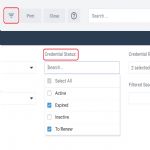
Select the filter icon and adjust "Credential Status" to view expired credentials or those in need of review; lastly, click "Filter & Hide" See Figure 2.
|
|
|
•
|
This list can be printed or saved to PDF by clicking the "Print" button; when finished reviewing, click "Close"
|
|
|
|
|
|
|
|
Figure 0,
|
|
|
Figure 0,
Click to open the Vendors Overview
|
|
|
|
Figure 1,
Select from the dropdown
|
|
|
|
Figure 2,
|
|
|
|
|
Figure 2,
|
|
|
|
|
|
|
|
| 5. Add a Mandatory Credential |
|
|
|
|
|
RedTeam users now have the ability to add Mandatory Credentials to any of their Vendors. These credentials are automatically added to any Commitment for which that Vendor is selected. The selected Vendor is then required to possess that credential before a commitment can be executed with them.
Using Mandatory Credentials helps reduce risk to your company by ensuring that every time a Commitment is created for that Vendor on any Project, the mandatory Credential is included in the �Required Credentials� step when creating a Commitment. Since Commitments can be configured to require these Credentials to be satisfied before they are either Committed or Executed, you can ensure they will be checked before one of those two critical points.
|
|
|
Path:
|
|
Companies Menu > Vendors menu > Vendor > Credentials tab
|
|
|
Steps:
|
|
•
|
From the Vendor Profile, click the Credential tab at the bottom, then click "+add new credential" See Figure 1.
|
|
|
•
|
Select the Credential Type from the dropdown and fill out the required information as well as upload a scanned copy (if applicable) See Figure 2.
|
|
|
•
|
Check "Mandatory" if you want this Credential to appear automatically on every Commitment for this Vendor
|
|
|
•
|
Click Save when finished
|
|
|
|
|
|
|
Figure 1,
add new Credential button
|

|
|
Figure 2,
Credential information form, with Mandatory checkbox
|
|
|
|
|
Figure 2,
|
|
|
|
|
Figure 2,
|
|
|
|
|


